Using the SMT100 with Python

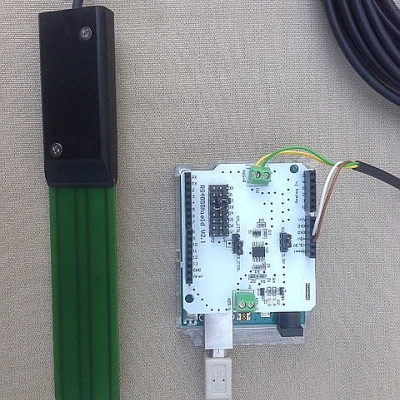
When I was young I started programming with punch cards, then moved to assembler which is still my favourite way of programming. From time to time I get interested in high level languages which are so popular these days. Python is among them and so I decided to make first step towards reading out the SMT100 soii moisture sensor from my PC or Raspberry Pi. The hardware required is a SMT100 in RS-485 ASCII version and a USB to RS-485 converter cable. A RS485 shield for the Raspberry Pi would be fine as well, but I simply started with the converter cable which provides power (5V), GND, RS-485A and RS-485B.

As a first step I developed this simpy Python code. Choose the correct COM port for your system.

import serial
import time

def GetTemperature():
    ser.readline()                                               # remove any unwanted characters
    command = bytes("GetTemperature!\r\n", 'utf-8')              # set command here!
    ser.write(command)                                           # write to serial port
    line = ser.readline()                                        # read from serial port
    line = line.decode('utf-8')                                  # convert bytes object to string
    line = line[:-2]                                             # remove CR+LF from right side of string
    if line == '':
        print("no response from sensor")  
    else:
        print("Temperature: "+ line+" °C")
    
def GetWatercontent():
    ser.readline()
    command = bytes("GetWatercontent!\r\n", 'utf-8')                                
    ser.write(command)
    line = ser.readline()
    line = line.decode('utf-8')
    line = line[:-2]
    if line == '':
        print("no response from sensor")                                        

    else:
        print("Watercontent: "+ line+" %")
    
port = 'COM3'                                                         # set comport here!
ser = serial.Serial( port,
         baudrate=9600,                                               # set baudrate here!
         bytesize=serial.EIGHTBITS,
         parity=serial.PARITY_NONE,
         timeout=1)

while(1):
    if(ser.isOpen() == False):
        print ("error open serial port: " + port)                    
        exit()                                 

    if ser.isOpen():
        print("Please enter your command: ", end = '')
        INPUT = input()
        
        if INPUT == "GetTemperature!":
            GetTemperature()
            
        if INPUT == "GetWatercontent!":
            GetWatercontent()
            
    else:
        print ("error communticating")                               
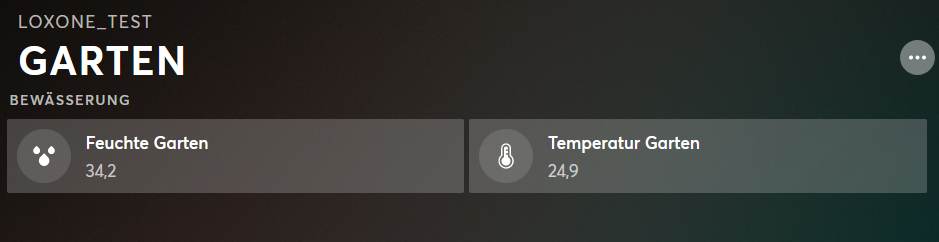
 

Usage

Please enter your command: GetTemperature!

Temperature: 24.7 °C

Please enter your command: GetWatercontent!

Watercontent: 96.46 %

Please enter your command:

Wireless soil moisture sensor with LoRa

My nephew visited me some months ago and asked me for a wireless soil moisture sensor. At that time I was already aware of those groundbreaking new wireless technologies like LoRa, Sigfox and NB-IoT, but had no comprehensive experience so far. So I decided to

  • get an overview of the competing technologies LoRa, Sigfox and NB-IoT,
  • develop some low cost wireless nodes
  • and get some practical experience.

This is the first part of my journey which covers LoRa. Before diving into the technical details let me talk about low power long range communication in general.The range of a wireless system mainly depends on these factors

  • transmitter power
  • receiver sensitivity (bandwidth)
  • antenna gain
  • radio environment (from line of sight to dense urban areas)

Many people are not aware that the radio environment has an extreme infkuence in range. There is easily a factor of 10 or morge in range comparing rural and urband sites. Datasheets often claim a range which can only be achieved under most favourite conditions and therefore disappointment is guaranteed.  I usually follow these rules:

  • use the highest transmitter power which is accpetable in regard to frequency spectrum regulations and power supply capability
  • use antennas with as much gain as possible
  • place the antennas as high as possible
  • use a low bandwidth/datarate to increase sensitivity (in my application I usually transmit only a few bytes of data)

Before LoRa it was already possible to achieve long range at low power, but LoRa made this possible at very low cost by integrating the required signal processing into a single chip. I usually go with the module RFM95 by HopeRF which is about 5-6 Euros and add an ATmega328 controller. Here you can see me first attempt.

Software is either pure LoRa or LoRaWAN in conjunction the TheThingsNetwork. For LoRaWAN I chose MCCI Catena LMIC lib which works quite well and a low power lib to achieve a few Mikroamps during sleep times. This way I am running an experiemental node in my garden together with an SMT50.

Soil moisture sensors and irrigation of lawn

My nephew recently visited me and asked for advice on lawn irrigation. He has a couple of soil moisture sensors placed all over his lawn in the root zone (about 10 cm deep) and is wondering how to adjust the threshold for irrigation. My first simple advice was just to observe the lawn and identifiy the water content when the leaves are getting brown. Brown leaves are an indication of water stress. My nephew was not really satisfied with this answer and said: "Grandma, you have such a long experience in gardening, you have a so-called green thumb, but I am a real novice. Could you please help me so that even I can adjust he irrigation threshold without observing the leaves". So did a survey and found this guide from the University of Florida on Smart Irrigation This is the sum up of their recommendations:

  • Place the sensor at locations which are representative for the area to be irrigated (see more details about sensor locations in the guide)
  • Burry the sensors in the root zone
  • Carefully install the sensors with no air gaps around the sensor
  • Calibrate the sensor
    • Apply water in the sensor area up to saturation
    • Do not apply water for 24 hours
    • Record the water content which is the threshold value (threshold can be adjusted to 20% lower than this value)

In any case I would always observe the lawn and see if it is in good shape with this irrigation threshold setting.

Where to buy the best thick shake?

It may sound a bit off topic, but I decided to share my experience in delicious food and drinks. As a passionate gardener I grow not only flowers but also vegetables and fruits, and of course I enjoy having good food. I came across many countries in the world and remember quite a number of unique spots. I start this series with my favourite shake supplier in the US which is Iceberg Drive Inn. The first restaurant open in 1960 in Salt Lake City.

My first experience with Icebergs was on a hot summer night in St. George, Utah. I came across Icebergs and decided to try their thick blueberry shake. It was incredible, both taste and size were amazing. Since that time I even take a longer detour just to enjoy the famous thick shake. My favourites are blueberry and strawberry.


Soil moisture measurement with Loxone and SMT100

This is my first step in building an automated irrigation system with the Loxone Miniserver. Loxone is a manufacturer of smart home systems and became quite popular due to its medium price tag and good support of interfaces. I decided to give it a try and chose the Loxone Miniserver and the corresponding Modbus extension. With the Modbus extension it is possible to add up to 32 Modbus devices. If this is not enough you can add more Modbus extensions Here is how the Loxone Miniserver looks like.

.

With Modbus RTU it is quite simple to add a SMT100 to the Loxone. The SMT100 is available as Modbus version (please mention this when ordering). The manufacturer TRUEBNER provides an application note and a Modbus test program. I configured the SMT100 as Modbus device with address 1. Here is the configuration required by the Loxone. Please first add the Modbus extension to the Miniserver and then connect the SMT100 to the Modbus extension. Do not forget to power the SMT100.

Step 1: Modbus Extension

Set Baudrate to 9600 and Parity to even

Step 2: Modbus Device

Set Modbus address

Step 3: Add Sensor settings for temperature

I/O address 0

Command 3 (read holding registers)

Data type 16 bit unsigned integer

Step 4: Add Sensor settings for moisture

I/O address 1

Command 3 (read holding registers)

Data type 16 bit unsigned integer

Use conversion formulas (math block formula)

moisture: 16 bit value /100

temperature: 16 bit value / 100 - 100

Use virtual status blocks to display moisture and temperature on the website

This is the final result

If anyone needs a more detailed explanation how to setup Loxone with the Modbus Extension please send me an email at maria.gardenergranny@gmail.com.

Of course it is not a requirement to use Modbus for the SMT100 with Loxone. There are two more options. First option: Use the SMT100 with analog voltage output. Second option: Use the SMT100 ASCII with an RS485 Extension. For me Modbus was the most convenient choice. I know Modbus from the beginng. I still remember the good old times back in 1979 when Modbus came on the market and I developed a Modbus controller for my sewing machine.


SMT100 RS485 with Arduino

The SMT100 by TRUEBNER is one of the most accurate low cost soil moisture sensors on the market. I was really amazed by the accuracy and repeatability presented in a scientific publication from the Research Center Jülich in Germany and instantly ordered a sensor opting for the RS485 version. RS485 is the standard used in many industrial applications but only specifies the electrical signals. The message format or protocol is another story. The protocol used by the SMT100 RS485 is T-BUS. You will find a good description on wikipedia. Though the T-BUS protocol is a very well designed and flexible protocol it requires some efforts to implement on the Arduino. I was to lazy for that and found out that the SMT100 is also capable of unterstanding simple ASCII commands. So I decided to spent a few minutes to write a small Arduino test program. Of course you do need a piece of hardware to interface an RS485 sensor to the Arduino. I had an RS485 shield from Sparkfun lying around but any of the other RS485 shields on the market should do the job as well and you only habe to spent a few bucks. The SMT100 has 4 wires which have to be connected to the shield as follows:

  • brown (Vcc, +5V)
  • white (GND)
  • green (RS485A)
  • yellow (RS485B)

This is how the setup looks like:

This is the code I have been using:

#include <SoftwareSerial.h>

SoftwareSerial mySerial(2,3);

String str;

void setup() {

  mySerial.begin (9600);

  Serial.begin(9600);

}

void loop() {

    if(Serial.available() > 0)

    {

        str = Serial.readStringUntil('\n');

        mySerial.println (str);

        delay(1000);

        if (mySerial.available() > 0){

          str = mySerial.readStringUntil('\n');

          Serial.println(str);

          } else {

             Serial.println("no response from sensor");

          }         

    }

}

There are two serial ports, the serial port to the PC and the software serial port to the RS485 shield. It is important to choose the right pins for TX and RX. RS485 in this case is half duplex, so you have to switch between TX and RX. On my shield this is automatically done when sending out data on the TX line. On other shields you may have to set a certain pin to transmit and release fo receive. On my shield this manual switching is also possible by appropriate jumper settings but I again took the lazy way relying on the automatic switching. The Arduino code waits for commands from the PC serial port. After hitting return on the keybord the command is transmitted to the sensor via the RS485 shield. Response time may be a few 100 ms and to be sure I introduced a one second delay before checking availability of data which is printed to the serial port to the PC again. Thats all.

Here are some examples of available commands:

Command: GetTemperature!

Answer: Temperature in degrees celsius

Command: GetWaterContent!

Answer: Volumetric water content in %

RS485 is a bus system so can you have more than one sensor attached. In this case it is important to configure each sensor with an individual address. During addressing only one sensor shall be on the bus. In order to set the address of a sensor to 1 you should enter:

Command: SetAddress!1

Answer: 1

You can check the address with:

Command: GetAddress!

Answer: 1

The commands to interrogate a sensor with address 1 are:

Command: GetTemperature!1

Answer: Temperature in degrees celsius

Command: GetWaterContent!1

Answer: Volumetric water content in %